
How to Install Exterior Wall Insulation: A Money-Saving Guide for Homeowners
Your home's walls might be costing you more money than you think. Most houses lose 20% of their heat through poorly insulated walls. For Canadian homeowners, where heating takes up 60% of household energy use, this means throwing money away every month.
The good news? Smart wall insulation choices make a real difference. EPA data shows proper sealing and insulation can cut your heating and cooling expenses by 20%. Quality exterior wall insulation helps you save money while making your home more comfortable throughout the year.
Many homes currently fall below the National Building Code's recommended R-20 value for main walls. Adding exterior wall insulation gives homeowners three key benefits: lower energy bills, better indoor comfort, and higher property value.
Ready to stop wasting money on heating and cooling? Let's explore everything you need to know about installing exterior wall insulation - from picking materials to steering clear of common mistakes that could cost you down the road.
Understanding Exterior Wall Insulation Benefits
Smart homeowners know exterior wall insulation delivers more than just warmth. The benefits stack up quickly - from slashing energy bills to creating healthier living spaces. Let's explore why Canadian homeowners consider this a game-changing investment.
Energy savings and reduced utility bills
Want to stop throwing money out your walls? Exterior wall insulation creates a powerful thermal shield around your home. Without it, 20% of your home's heat simply escapes through the walls, forcing your heating system to work overtime.
The numbers tell an impressive story:
Proper wall insulation cuts heating costs by 20-30%
EPA data shows 15% savings on heating and cooling (11% total energy costs) with proper insulation and sealing
Detached homes save up to $255 CAD yearly
Canadian homeowners, here's a bonus - the Canada Greener Homes Initiative offers substantial grants when you insulate at least 20% of your exterior wall area. Most homeowners see their investment pay off through lower utility bills within 10-15 years.
Improved home comfort year-round
Money aside, quality wall insulation transforms how your home feels every day. Say goodbye to those annoying cold spots and drafts that make rooms uncomfortable.
Winter brings extra benefits - warmer walls mean less condensation, which cuts down on dampness and mold. Your indoor air stays healthier, while summer months stay cooler without overworking your AC. Think consistent comfort no matter what Mother Nature throws your way.
Noise reduction benefits
Ever wished you could turn down the volume of the outside world? Here's where exterior wall insulation really shines. It acts like a sound barrier, muffling noise before it enters your home.
Materials like mineral wool work especially well against those hard-to-block low frequency sounds. Picture this - a 10 dB drop in noise levels cuts the perceived volume in half. That busy street? Now it's just background noise.
Living near traffic or in bustling neighborhoods? Quality insulation creates your own peaceful sanctuary, blocking both street noise and sound between homes.
Increased property value
Smart upgrades pay off when it's time to sell. UK government research shows energy efficiency improvements like exterior wall insulation can boost property values up to 38%.
Today's buyers hunt for homes that promise:
Lower long-term energy costs
Smaller carbon footprints
Better curb appeal
Future-proof efficiency features
Properties with quality wall insulation often fetch premium prices, especially as energy costs and environmental awareness rise. Think of it as an investment that pays you back twice - first in comfort, then in resale value.
Assessing Your Current Exterior Wall Insulation
Ready to upgrade your wall insulation? First, let's figure out what you're working with. Smart homeowners know the signs of poor insulation and understand how to check their walls' current insulation levels.
Signs your walls need better insulation
Your walls talk - you just need to know what they're saying. Cold spots on interior walls during winter months scream "insufficient insulation". Notice some rooms feel like fridges while others stay toasty? That's your walls telling you about uneven insulation distribution.
Money talks too. Those sky-high energy bills? They're saying your heating system works overtime pushing warmth through poorly insulated walls.
Watch out for these moisture warning signs:
Damp patches on interior walls
Visible mold growth
Condensation on wall surfaces
These issues pop up when warm indoor air hits cold walls lacking proper insulation, creating perfect conditions for mold and mildew.
Physical red flags often show up as:
Cracking or peeling exterior render
Sagging insulation (watch those fiberglass and cellulose spots)
Exterior wall damage letting moisture sneak in
These problems don't just look bad - they let heat escape while moisture creeps in. Feel drafts around windows and doors? That's air leaking through compromised insulation spots.
How to check existing R-values
Time to play detective with your wall's R-value (that's the thermal resistance measurement). Higher numbers mean better insulation.
Want a quick DIY check? Energy Star suggests this outlet inspection technique:
Kill the power (use a voltage tester - safety first!)
Pop off the outlet cover
Shine a flashlight around the outlet box
Look for insulation in the wall cavity
Check multiple outlets - older homes often have different insulation levels
Canadian homes need specific R-values based on location. Most regions want R-13 to R-23. Got a pre-1980s house? Chances are your insulation falls short of today's standards.
Different insulation types pack different punches:
Rigid foam boards
Spray foam (open-cell vs closed-cell varieties)
Traditional fiberglass and cellulose (watch for compression issues)
Found your insulation lacking? Multiple upgrade paths await. Remember - even with cavity insulation looking good, thermal bridging through wood framing might still rob you of efficiency.
Choosing the Right Exterior Wall Insulation Materials
Think of insulation materials like winter coats - some are light and affordable, others premium and heavy-duty. Your perfect match depends on local weather, budget, and performance needs. Let's explore the best options for Canadian homes.
Rigid foam board options and R-values
Rigid foam boards pack serious thermal punch. Three main players dominate the field:
Expanded Polystyrene (EPS) - the budget-friendly champion:
R-value: R-3.8 to R-4.2 per inch
Light on your wallet
Decent moisture resistance
Perfect for basic insulation needs
Extruded Polystyrene (XPS) - the cold weather warrior:
R-value: R-5 per inch
Spot it by its blue or pink color
Loves cold weather (10% more effective below 25°F)
Superior moisture protection
Polyisocyanurate (polyiso) - the premium performer:
R-value: R-6 to R-6.8 per inch
Comes with reflective foil armor
Best for moderate temperatures
Top-tier thermal protection
Spray foam insulation considerations
Spray foam seals the deal on gaps and cracks. Pick your fighter:
Open-cell spray foam:
R-value: R-3.6 to R-3.8 per inch
Expands like bread dough
Sound-dampening superstar
Perfect for interior spots
Closed-cell spray foam:
R-value: R-6 to R-7 per inch
Dense as a fortress
Blocks both air and moisture
Adds structural muscle to walls
Got existing walls? Injection foam sneaks in through tiny holes in your siding - no drywall removal needed.
Batt and blanket insulation for exterior applications
Fiberglass batts - the tried-and-true veteran:
Most wallet-friendly option
R-values: R-2.9 to R-4.3 per inch
R-13 for 2×4 walls, R-19 for 2×6 walls
Watch out though - air sneaks through fiberglass, and poor installation kills performance.
Cost comparison of different materials
Money talks - here's what different materials say per square foot:
EPS rigid foam: CAD 0.98 to CAD 1.39
XPS rigid foam: CAD 1.25 to CAD 1.81
Polyiso rigid foam: CAD 1.39 to CAD 2.09
Open-cell spray foam: CAD 2.09 to CAD 4.88
Closed-cell spray foam: CAD 2.44 to CAD 6.27
Fiberglass batts: CAD 0.89 to CAD 1.66
Here's the kicker - insulation materials only eat up 15-20% of total retrofit costs. Smart money goes for higher R-values (R-15 to R-20) instead of skimping with minimal protection (R-4 to R-10).
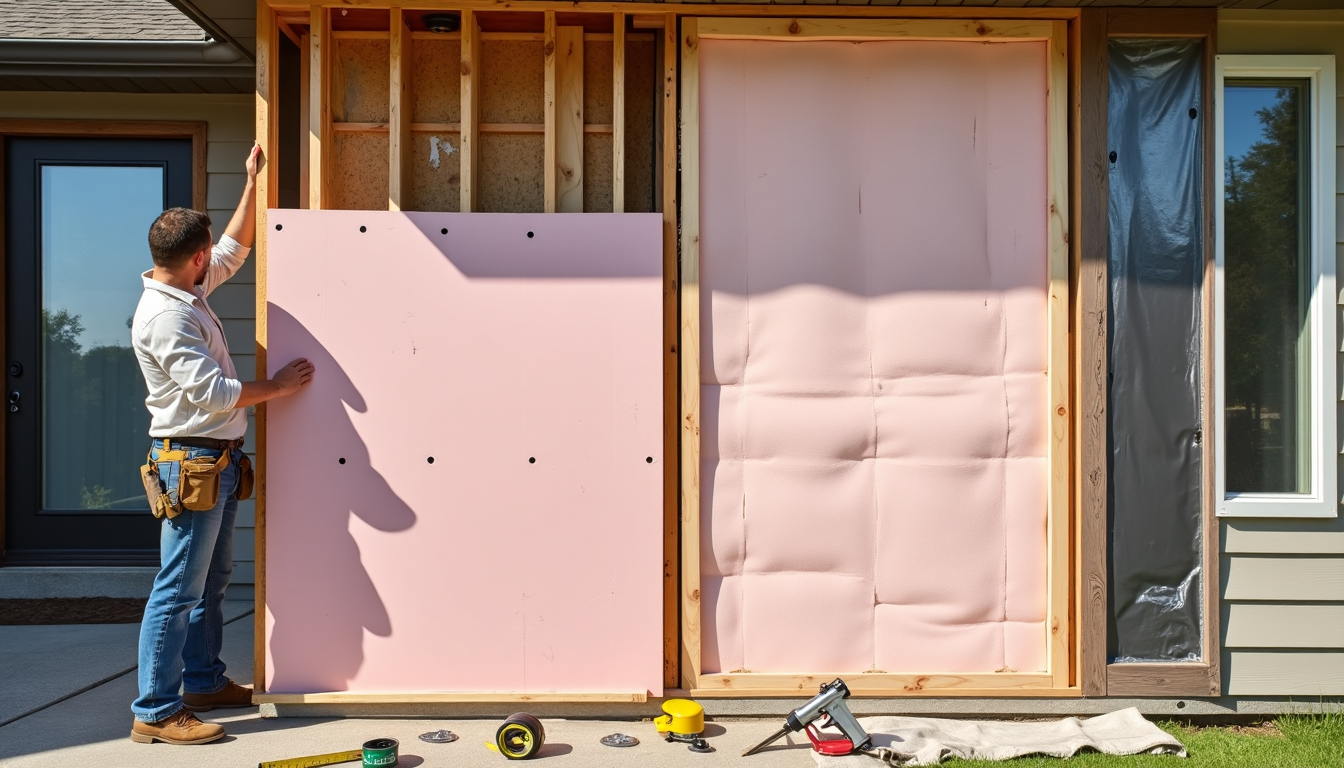
Step-by-Step Installation Process
Ready to tackle exterior wall insulation? Success demands careful planning and attention to detail. Let's walk through each step to ensure your installation delivers maximum energy savings and durability.
Tools and materials needed
Time to gear up! Here's your installation arsenal:
Essential tools:
Drill/driver with proper bits
Utility knife plus straight edge
Measuring tape
Caulking gun
Putty knife for sealants
Safety gear (don't skip these!):
Work gloves
Eye protection
Dust mask
Drop cloth for debris
Bonus helpers:
Lightweight stapler
Extension pole or rake for those tricky spots
Vapor barrier installation tools
Preparing the exterior wall surface
First things first - strip your walls bare:
Remove existing siding
Take down downpipes and fixtures
Check walls for rot or insect damage
Smooth or remove unstable render
Set up temporary downpipes (water management matters!)
Install carrier tray at the bottom edge
Installing insulation boards or batts
Working with rigid boards? Here's your game plan:
Spread adhesive on board backs
Press firmly against wall surface
Add mechanical fixings for extra grip
Create tight joints between boards
Cut precisely around windows and doors
Batting for team fiberglass? Remember:
Fit snugly without squishing
Split around wiring (one piece front, one back)
Cover every nook and cranny
No gaps allowed!
Proper sealing techniques
Think of sealing as your insulation's bodyguard. Small gaps become big problems. Guard these spots:
Board joints (use compatible tape or liquid flash)
Electrical outlets
Water spigots
HVAC vents
Remember - even tiny openings steal your energy savings. Proper sealing keeps moisture out and efficiency in.
Adding weather barriers and cladding
The grand finale needs a weather-resistive barrier (WRB). Choose your champion:
Housewrap (like Tyvek)
Liquid-applied membranes
Next steps:
Install vertical furring strips through insulation
Secure into structural sheathing
Create drainage plane between WRB and cladding
This setup lets any sneaky moisture escape safely, protecting your wall assembly for years to come.
Common Mistakes to Avoid When Installing Exterior Wall Insulation
Quality materials alone won't guarantee success. Smart homeowners know the hidden pitfalls that can turn their insulation investment into a costly headache. Let's tackle the three biggest mistakes that catch people off guard.
Ignoring moisture management
Moisture control makes or breaks your insulation project. Cold weather brings a sneaky enemy - condensation inside your walls. Most folks blame diffusion, but air leaks usually cause the trouble.
Picture this scenario: Your exterior insulation falls short, and interior air hits its dewpoint temperature at the sheathing's back surface. Result? Frost forms in cold weather. Spring thaw turns that frost into what looks like mysterious leaks. Worse yet, trapped moisture starts rotting your walls.
The solution? Balance matters. Your walls need the right exterior-to-interior insulation ratio:
Climate Zone 5 sweet spot: 38% exterior to 62% cavity insulation
Proper proportions keep sheathing temperatures above dewpoint
Result: No condensation forming in your wall assembly
Improper sealing around windows and doors
Those tiny gaps around windows and doors? They're stealing your comfort and cash. Poor sealing creates thermal bridges - superhighways for heat loss and cold infiltration.
Seal these critical spots:
Window frame perimeters
Door frame edges
Flashing joints (stops rain from sneaking in)
Insulation transition points
Here's a pro tip: Even "airtight" windows need proper sealing behind their trim. This often-missed step delivers serious energy savings.
Neglecting proper ventilation
The ventilation puzzle trips up many homeowners. Sure, you want an airtight house - but your walls need to breathe. Don't make the rookie mistake of blocking air bricks or existing vents without creating new airflow paths.
Watch these ventilation vital signs:
Keep trickle vents clear (especially in kitchens and bathrooms)
Maintain controlled air exchange
Balance airtightness with proper airflow
Remember: Trapped moisture loves poorly ventilated walls. Give moisture an escape route, or you'll be fighting mold and rot down the road.
Final Thoughts on Exterior Wall Insulation
Smart Canadian homeowners know a good investment when they see one. Quality exterior wall insulation delivers the trifecta - slashed energy bills, superior comfort, and boosted property value. Those 20-30% energy savings add up fast, making this upgrade pay for itself while making your home more enjoyable year-round.
Want your insulation project to succeed? Remember these winning moves:
Choose materials that match your climate and budget
Master moisture management from day one
Seal every gap like money might leak out (because it will!)
Keep your walls breathing with proper ventilation
Sure, the upfront costs might raise eyebrows. But think of exterior wall insulation like a premium winter coat for your house - pay once, stay cozy for years. Those monthly energy bills will remind you why it was worth every penny.
Not sure where to start? Talk to qualified pros who know the local climate and building codes. They'll help you dodge common pitfalls and maximize your investment returns. With smart planning and proper installation, you're not just insulating walls - you're building a more comfortable, efficient future for your Canadian home.